


🚀 Unleash Your Creativity with the Ultimate Raspberry Pi Experience!
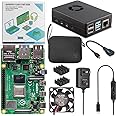
The Vilros Raspberry Pi 4 4GB Basic Starter Kit includes a heavy-duty aluminum alloy case with a fan for superior cooling, 4GB of RAM for enhanced performance, and a USB-C power supply with an on/off switch. This versatile mini-computer is perfect for a wide range of applications, from gaming to server management, and offers significant upgrades over previous models.


| Processor | 1.5 GHz MediaTek_MT8125 |
| RAM | 4 GB DDR4 |
| Wireless Type | Bluetooth |
| Brand | Vilros |
| Series | Raspberry Pi 4 |
| Operating System | [User Choice] |
| Item Weight | 1.01 pounds |
| Package Dimensions | 7.32 x 6.34 x 2.28 inches |
| Color | Black |
| Processor Brand | Broadcom |
| Number of Processors | 1 |
| Computer Memory Type | DDR2 SDRAM |
| Manufacturer | Vilros |
| ASIN | B07XTRK8D4 |
| Country of Origin | China |
| Date First Available | September 12, 2019 |
D**J
Great starter kit for the Raspberry Pi 4
As advertised, this kit has almost everything somebody needs to start doing projects with the Pi.As per the product description, it comes with a case, the Pi itself (I bought the 4 GB RAM model), USB-C power supply, micro HDMI to HDMI converter cable, two heatsinks, and the quickstart guide, all contained within a single plastic bag (all of the important components were in boxes).However, you will still a few more components before you get everything up and running, including:- A HDMI cable for a monitor- A keyboard/mouse for input (I use a Logitech K400+ wireless touch keyboard and it works great)- A micro SD card for memory storage/operating system (recommend at least 8 GBs or more, Raspbian OS will take up 1-5 GBs of space depending on the installation you choose; I currently use a Samsung 32GB U1 MicroSDHC EVO Select Memory Card in my setup)The Raspberry Pi 4 itself is a nifty card-sized computer, and I am currently using it as a personal VPN device (running PiVPN) and PiHole for ad blocking, with future plans for a NAS installation.------------------For the rest of the review, I'll try to focus mainly on the components unique to this kit:- For me at least, the included heatsinks DO fit in the case; they were easy to place and the case closed without issues. My Pi runs between 35-40 C on the quieter pin setup with normal operations (including with Chromium browser use and games running) and hovers between 30-35 C when idling.- The case is completely matte black inside and out and seems to be of high quality aluminum, with both the top and lower parts of the shell machined well enough and fits together nicely (it did require a tiny bit of pressure to snap the top/lower parts together after sliding the Pi into place but otherwise no parts on the board are touching the case or fan and sits well inside). The case fan is already in place inside of the top case shell when it arrived, and I have not attempted to remove fan yet. Per customer support, the fan can be removed and replaced with a 30x30 mm fan.- The Vilros branded micro HDMI to HDMI adapter cable included with this kit is adequate for its purpose. Some of the reviews here mention the micro HDMI end of the cable seems to be loose; I thought this was also the case for me too at first until I noticed that you have to push the connector all the way into the port itself for it to seat properly. Once you do this, it seems to be secure and doesn't jiggle at all, and I haven't had any issues with the cable breaking since I bought the kit.I think one of the nicer selling points of this kit are the guide/paperwork included with the kit, especially the quickstart guide. For somebody new to the Pi (myself included), having some decent instructions to point me in the right direction right out of the box was comforting and helped build my confidence in putting everything together and get it up and running (see my pics for some included inserts from the package that might help you readers out).Overall, I feel that this was a worthwhile purchase and I'll make sure to post updates if something happens to any part of the kit or the Pi as I'm using them.Pros:- The included peripherals (HDMI adapter cable, case, fan, heatsinks) are of good build quality (at least for my order) and are adequately priced when bought together as a kit vs separately- Case is strong and well-machined, parts fit inside well enough- Good instructions included in package for Pi newbiesCons:- None at this time
M**N
The best case available IMHO.
The aluminium case is very good, by far the best case I have used for any of the raspberry pi's so far. The power supply seems solid. This is the third aluminium case I have purchased from Vilros. The first two did not extra wire to control the fan speed. The first two the fan just ran at a slow speed all the time. I set this to start at 60 degrees C and stop when it gets back to 50 degrees C. It is running in an air conditioned warehouse. It has been running at about 47 degrees C. It is printing documents using PrintNode service. The other pi's that are doing the same but the fan is running slowly but constantly are running 10 degrees C cooler. I don't think the fan has turned on yet as it is not getting anywhere close to 60 degrees C. I am not sure what is better. I think this can be setup to run at the slow speed too.
A**R
Went for it with no reviews, and I like it a lot!
Took a chance on this with no reviews, one over the usual kit, and I'm very happy with it. The case is indeed solidly built, hefty, and the fan is nice with two pin modes (quiet and normal). If you're like me and wanting to do this as a weekend project, let me save you a little time as you might have some of the same questions during setup:- Fan: Take an extra second reading the fan wiring instructions carefully, it's super easy and clear to install but if you mix up the pins like I did the fan will run but it will interrupt booting (and give you a solid red light with no green). I thought this was an eeprom error and spent too much time troubleshooting it that way, but realized I had the wires mixed up. Works great now with no problems.- Feet: The rubber feet are indeed cut out from the adhesive even if they don't look it at first, just peel away and stick, no need to cut them out.- Heatsink: It doesn't look like the two smaller heatsinks (of the 4) can be in place with the case top on; instead there's two heat-pipes that extend down from the case lid that rest on the two small chips. Maybe someday I'll apply thermal paste to make the connection, but that day is not this day. The other two larger ones apply nicely.- Seating: Carefully slide the pi board power/hdmi ports into their holes first, and then push down and it should sit nicely. Otherwise the holes won't line up and you'll be momentarily confused.- Case snaps together and stays tight, then four screws from the bottom to secure. The micro to hdmi adapter is nice to have too.
Trustpilot
2 days ago
2 weeks ago
1 month ago
2 months ago

![[Older Version] SanDisk 128GB Ultra microSDXC UHS-I Memory Card with Adapter - 120MB/s, C10, U1, Full HD, A1, Micro SD Card - SDSQUA4-128G-GN6MA](https://images-na.ssl-images-amazon.com/images/I/51rH2h2FxqL._AC_UL116_SR116,116_.jpg)
![SanDisk 128GB Ultra microSDXC UHS-I Memory Card with Adapter - Up to 140MB/s, C10, U1, Full HD, A1, MicroSD Card - SDSQUAB-128G-GN6MA [New Version]](https://images-na.ssl-images-amazon.com/images/I/71HMMAm+TlL._AC_UL116_SR116,116_.jpg)